DIY Face Mask Pattern & Tutorial
Create two masks out of a fat quarter using this Face Mask Pattern and Tutorial. These reusable face masks have a nose wire, filter pocket, and can be made with hair ties if you do not have elastic. This fabric face mask has good coverage of the face all way down to the chin.

DIY Face Mask Pattern
What a crazy month it has been. We are all remaining home because the world is dealing with this new threat. The CDC now recommends that all Americans wear a face mask, but they are in short supply. Stores are all out of elastic. People are searching online for alternatives to elastic. When I searched how to make face mask, several mask patterns showed up but I did not love any of them. I took the best parts of several instructionals and created my own face mask pattern. The sewing tutorial can be found at the bottom of this post.
Please note: Cloth face masks are used to slow the spread of viruses and help people who may have a virus and do not know it from transmitting it to others. These are not proven to prevent virus contraction.
Fat Quarter Size
Since many stores are closed, it is difficult to get custom cuts of fabrics. I have several fat quarters on hand and realized one is the perfect size to create two masks. Fat quarters are precut, so you do not have to wait for someone to cut the fabric for you.
What is the size of a fat quarter? A typical yard of 100% cotton fabric is 36” x 44”. A FQ or fat quarter of fabric is one-fourth of that when cut in half one-way, and then those two pieces cut in half the perpendicularly. FQs come cut this size.
,While fabric stores might be closed or in short supply, you can order a fat quarter bundle from Etsy or Amazon and create many cute designs. These bundles are often used in quilting, so the designs are small which makes for a good mask.
Face Mask Template
Here is the fabric face mask pattern that I created for the masks. It is a pattern guide to show you what size to cut, not an actual printable.

Face Mask Sewing Tips
It might seem a little difficult the first time you make this pattern, but the steps below will walk you through. Once you figure out how to do step 18, you will be able to whip out several of these cloth masks. Check out my face mask tutorial video which is slowed down at this part so you can understand this challenging part.
The instructions were created to utilize non-metal elastic hair ties; you know the ones like this that hold ponytails. Do not use thick bands. If you do not have these hairbands or elastic, then create t-shirt yarn out of old shirts. I like to string one long strip of t-shirt yarn down through the side casings and then tying them off at the base of the neck. Cutting first aid elastic bandages into strips is a good solution too.
Nose Wire
My tutorial utilizes pipe cleaners for the wired nose piece because that is what I have on hand. You can use floral wire, folded aluminum foil, or bread bag twist ties. I recommend folding the ends in so it does not have a sharp edge that pokes out or through the fabric.
Kids Face Mask
Need to make a mask for a child? Reduce the size of your face mask pattern to 9” x 13” or even smaller. I do not have a small child at home, so if you make a smaller one please let me know what size of fabric that you stared with so that I can update this post.
Donate or Sell Masks
Sewing face masks to donate or sell is great for helping out the cause. I have sold a few masks, but I have donated many to some front line workers, the elderly, and a local hospital. I have created a sheet of instruction tags that you can download and print to include with masks you make for others. Get those labels here.
If you are looking to make more PPE, check out my DIY Shoe Covers tutorial.


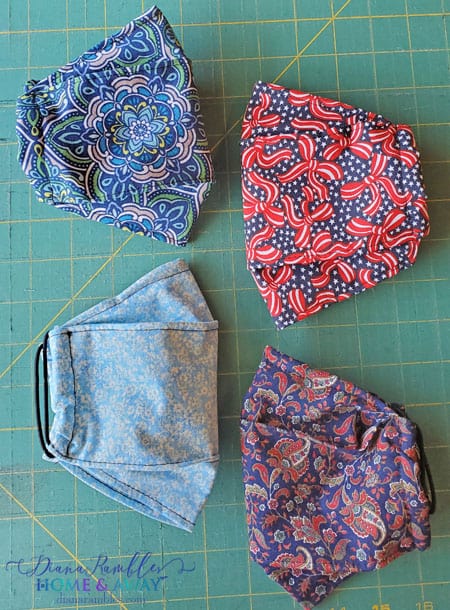
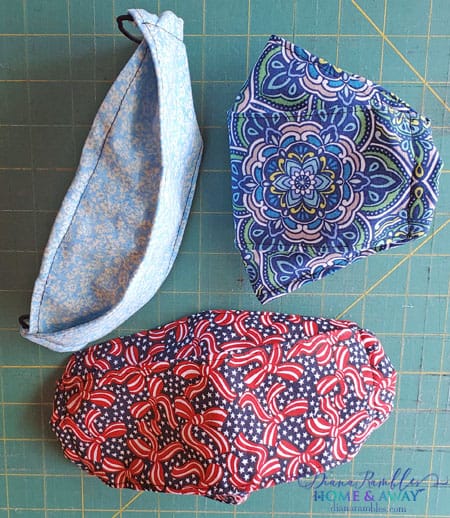
DIY Fabric Face Mask
Create two Fabric Face Masks with nose wire & filter pocket out of one Fat Quarter
Materials
- Fat Quarter of Fabric
- Pipe Cleaner
- 4 hair ties or elastic
Tools
- scissors
- straight pins
- sewing clips
- sewing machine
- iron
- optional: sewing clips
Instructions
- Wash & iron your fat quarter.
- As the pattern guide above shows, cut the fat quarter in half to get two 11” x 18” pieces.
- Cut 3” off one end of each piece so you have two 11” x 15” pieces and two 11” x 3” pieces.
- Center the 3” piece of fabric across the middle of the larger piece and stitch the side edges in place. There will be 6” on each side of this center strip.
- Serge the 11” edges. If you do not have a serger, zigzag the edge on your sewing machine or use pinking shears to minimize fraying of the edges.
- Fold right sides together matching the serged edges.
- Measure and mark 3” in from the outside of each edge and stitch a ¼” line along the serged edge.
- Match the center of the opposite side with the serged seam and iron flat, as shown here in the video.
- Measure and mark 2” angles on each corner and stitch along each marking.
- Cut each corner off.
- Turn the mask right side out, making sure all the seams are popped out and press.
- Cut a 3” piece of pipe cleaner. I recommend that you fold under and crimp each edge of the pipe cleaner piece. I used these craft pliers to cut and crimp.
- Center the pipe cleaner inside the top edge of the mask.
- Topstitch around the top and bottom the mask from open edge to open edge, making sure to keep the pipe cleaner snugged up against the top.
- Tack a few stitches next to the ends of the pipe cleaner to hold in place.
- Fold the top and bottom edge approximately 2” over the pocket side so they overlap slightly. The middle part will be just a smidge over 3”
- Topstitch along the top and bottom edge.
- On one side of the mask fold the angled piece over so that it is parallel to the outside edge and the corner is at the edge and clip in place. This is the tricky part, so I recommend that you watch this step on my YouTube video. Note: You can pin the edge in place, but it is thick so I highly recommend sewing clips.
- Repeat the adjacent edge.
- If you are using an elastic hair tie, place it over the outside end and fold that edge in twice and clip in place to form the casing over the elastic.
- Repeat for the adjacent edge. You might need to use an additional clip in the center to hold the folded edge in place.
- SLOWLY stitch the casings closed. The layers are very thick, so it is important to go slow so you don’t break the sewing machine.
- If you are using elastic or t-shirt yarn instead of a hair tie, use a drawstring tool to thread it through the casing.
- You can go back to step 5 and complete the other mask, but I recommend that you do each step for both at once. I had two yards of fabric, so I was able to complete 16 masks in a few hours.
Notes
Please share a photo of your creations on this pin on Pinterest.
Recommended Products
As an Amazon Associate and member of other affiliate programs, I earn from qualifying purchases.